Monday, October 12, 2020

PIC16F887 External Interrupt Example With 7-Segments Display In MikroC

An Overview Of External Interrupt

An interrupt of the MCU is an event that triggers a notification to the CPU. The CPU itself could responds to that events, or could ignore. Responding to the interrupt takes a very short time to handle and come back to the program main loop. Interrupt is very fast. It make the embedded controller program more responsive and more effective.

In the mid-range PIC microcontroller, an interrupt could create by an external events or by an internal peripheral operation. The external event may cause by any logic change to any digital input pin. A communication to the external device also create an interrupt, but we don't want to talk more about this here.

PIC16F887 External Interrupt Example With 7-Segments Display In MikroC
Programming Sample Of External Interrupt

For PIC16F887 the interrupt creates by the digital input output pin has two categories - an external interrupt creates by RB0-INT input pin, and the interrupt on change creates by any pin on PORTB input.

In this post we gonna talk about the external interrupt creates by INT pin. There are two choices of logic changes that could trigger an interrupt on this pin - on the falling edge and on the rising edge. The OPTION_REG register configures each choices.


The OPTION_REG register

Bit 6 (INTEDG) selects between the rising and the falling edge of interrupt creates by the pin INT. Programming the external interrupt we need to configure the following stuffs:

  1. Set RB0-INT pin as a digital input
  2. Optionally turn on its individual weak pull up resistor.
  3. Turn on the external interrupt enable (INTE) bit and the global interrupt enable (GIE) bit in the interrupt control register (INTCON).
  4. Select between that two interrupt edge
  5. Clear the external interrupt flag (INTF) of the INTCON register.
  6. In MikroC, write the Interrupt Service Routine (ISR) to handle the job. Within this routine the programmer must firstly test the INTF to get the external interrupt event, then writing a block of codes to for this event. Within the final line of this block, the INTF bit must be clear by software.


The Interrupt Control Register (INTCON) has many configurations and flag as lists below.

PIC16F887 External Interrupt Example With 7-Segments Display In MikroC
Interrupt Control Register (INTCON)

External Interrupt Programming In MikroC

This example may become difficult to some novice microcontroller programmer. To get a simple introductory programming example about using the external interrupt in MikroC, see this post.

Here, the MCU display the counting data on a multiplexed 7-segments display. The counting has a 99 maximum decimal values. After reaching the maximum value it rolls back to 0.

The counting increment creates by the falling edge of the INT pin. As mentioned earlier, using the interrupt the main program keeps executing its main task. The interrupt event occurs in a very short time and the main program doesn't need to poll for this event.

MikroC Program

  1. #define SW PORTB.RB0
  2. #define RATE 10
  3.  
  4. char CNT=0;
  5.  
  6. void interrupt() {
  7. if(INTCON.INTF)
  8. CNT++;
  9. INTCON.INTF=0;
  10. }
  11.  
  12. void SSD(char TEN,char ONE) {
  13. char LED[10]={0x3F,0x06,0x5B,0x4F,0x66,0x6D,0x7D,0x07,0x7F,0x6F};
  14. // ROUTINE FOR SEVEN SEGMENTS
  15. PORTA=LED[TEN];
  16. PORTB=0x80;
  17. delay_ms(RATE);
  18. PORTB=0x00;
  19.  
  20. PORTA=LED[ONE];
  21. PORTB=0x40;
  22. delay_ms(RATE);
  23. PORTB=0x00;
  24.  
  25. }
  26. void main() {
  27. char CNT1=0;
  28. PORTA=0x00; // CLEAR PORTBA
  29. PORTB=0x00; // CLEAR PORTB
  30. TRISA=0x00; // SET PORTA AS OUTPUT
  31. TRISB=0x01; // SET RB0 AS INPUT
  32. ANSELH=0x00; // DISABLE ANALOG FUNCTION ON PORTB
  33. OSCCON|=0x70; // SELECT 8MHz INTERNAL OSCILLATOR
  34. OPTION_REG.NOT_RBPU=0; // Enable Global WPUB
  35. OPTION_REG.INTEDG=0; // Interrupt from High TO Low
  36. WPUB=0x01; // Enable WPUB for RB0
  37. INTCON.GIE=1; // Enable Global Interrupt
  38. INTCON.INTE=1; // Enable External Interrupt
  39. INTCON.INTF=0; // Clear External Interrupt Flag
  40.  
  41. // MAIN ACTIVITY
  42. while(1) {
  43. if(CNT==10) { CNT=0; CNT1++; }
  44. if (CNT1==10) CNT1=0;
  45. SSD(CNT1,CNT);
  46. }
  47. }


Thursday, October 8, 2020

Accessing the internal 8 MHz oscillator of PIC16F887 in MikroC

Overview Of The Internal Oscillator of PIC16F887

One of the extended features of PIC16F887 over the previous PIC16F887A is the internal calibrated RC oscillator. Using this internal oscillator, the clocking module inside works statically, mostly prevented from the noisy environment creates by the external RF signal. 

Furthermore, there're many options with internal clock. The external clock pins - RA6 and RA7 could be selected as a digital input output pin when the MCU clock is configured as internal oscillator with digital I/O.

The internal oscillator is divided into two blocks - LFINTOSC and HFINTOSC. The LFINTOSC in a lower frequency clock below 31 kHz. The HFINTOSC is a higher frequency ranges from 125 kHz to 8 MHz.

The internal clock setup must be done in the configuration bits and the OSCCON register. Another register OSCTUNE give a steady tuning to any frequency while the program is running, without any interruption.

PIC MCU clock source block diagram

In MikroC the configuration of the MCU must be done in the MCU property window. In this IDE press Shift + Ctrl + E to get this window.


The OSCTUNE (Oscillator Tuning Register) 

The OSCCON (Oscillator Controller Register)


Programming in MikroC

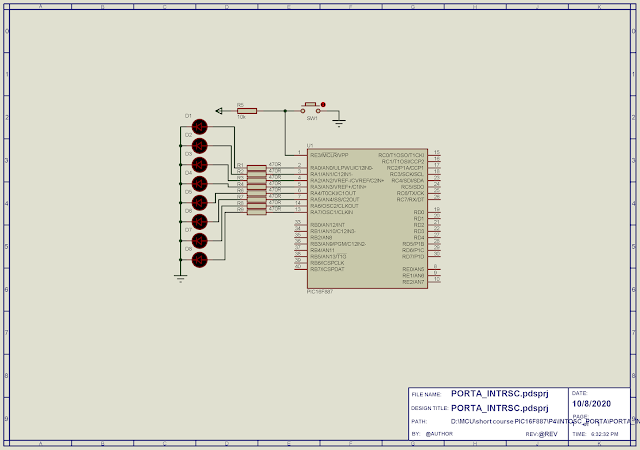
In this example, I use the internal oscillator to clock the CPU up to 8 MHz. PORTA displays a shifting data repeatedly.

Accessing the internal 8 MHz oscillator of PIC16F887 in MikroC
Schematic Diagram

The C source code in MikroC setup the internal oscillator one-by-on.

  1. void main() {
  2. char LED;
  3. PORTA=0x00; // CLEAR ALL PORTA
  4. TRISA=0x00; // ALL PORTA AS OUTPUT
  5. OSCCON.IRCF0=1; // Set IRCF=0b111
  6. OSCCON.IRCF1=1; // to select 8MHz
  7. OSCCON.IRCF2=1;
  8. while(1)
  9. {
  10. LED=0x01;
  11. while(LED!=0x00) {
  12. PORTA=LED;
  13. delay_ms(100);
  14. LED<<=1;
  15. }
  16. }
  17. }

Using PORTB internal resistors of PIC16F887 in MikroC

Overview Of PortB and its associate's 

PortB of PIC16F887 is a bi-directional digital I/O. PORTB is its I/O register. It's an 8-bit read/write register. 


The corresponding directional control of PORTB is TRISB (PORTB Tri-State Register) register. Clearing this register to make an output port.


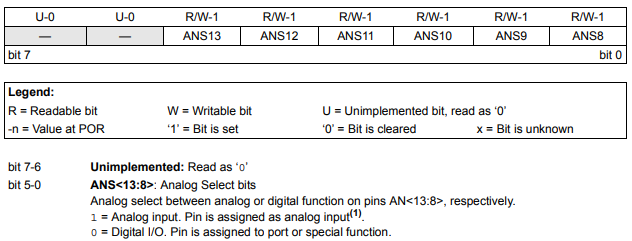
The analog input function is partially multiplexed with this port. The ANSELH (Analog Select High Register) associates with this port in the input operation.


The weak pull up resistors built inside the MCU could be individually turning on by software setting. The WPUB (Weak Pull-Up PORTB Register) turn on and off the internal resistor of PORTB individually.


The RBPU (PortB Pull-up Enable) bit of the OPTION register is the global switch of WPUB. Clearing this bit to enable this feature.

Programming in MikroC

In this example, I use the lower nibble of PORTB as a digital input. This nibble is turned on high by its internal weak pull up resistor configured in software.

Using PORTB internal resistors of PIC16F887 in MikroC
Schematic Diagram

The lower nibble is an input to the higher nibble that connect to four LED(s). 

  1. void main() {
  2. PORTB=0x00; // Clear portb
  3. TRISB=0x0F; // RB0-RB3 input RB4-RB7 output
  4. ANSELH=0x00; // Disable Analog Function
  5. OPTION_REG.NOT_RBPU=0; // Enable weak pullups on portb
  6. WPUB=0x0F; // Enable Weak pullups on RB0:RB3
  7. while(1)
  8. PORTB=PORTB<<4; // Shift left 4 times
  9. }

PIC16F887 toggling an output relay

In the previous post, we have discussed about using the digital input/Output of PORTA. Now let move to a typical example of turn on a relay on and off. This job is easily done by inverting the output bit of PORTA register.

PIC16F887 toggling an output relay
Schematic Diagram

Each time the switch connects to RA0 is pressed, the CPU toggle the output relay.

  1. #define RLY PORTA.F1
  2. #define SW PORTA.F0
  3.  
  4. void main() {
  5. PORTA=0x00; // CLEAR PORTA
  6. TRISA=0x01; // RA0 IS INPUT
  7. ANSEL=0x00; // Disable all analog function
  8. while(1)
  9. {
  10. if(SW==0)
  11. {
  12. while(SW==0) ; // wait for switch release
  13. RLY=RLY^1; // toggle relay on/off
  14. }
  15. }
  16. }

Using PORTA of PIC16F887 as a digital I/O

An Overview Of PORTA

Some pins PORTA of the PIC16F887 is multiplexed with the analog input channels. Using them as an input they are the analog input channel by default.

PORTA  is the input output read/write register.


It's data direction is controlled by TRISA. Setting TRISA to output the data to outside world otherwise accepting the data into the MCU.


The ANSEL register is set by default, keeping PORTA input as an analog input channel. Clearing some bits of this register to get back to the digital input pin.

MikroC Programming of PORTA


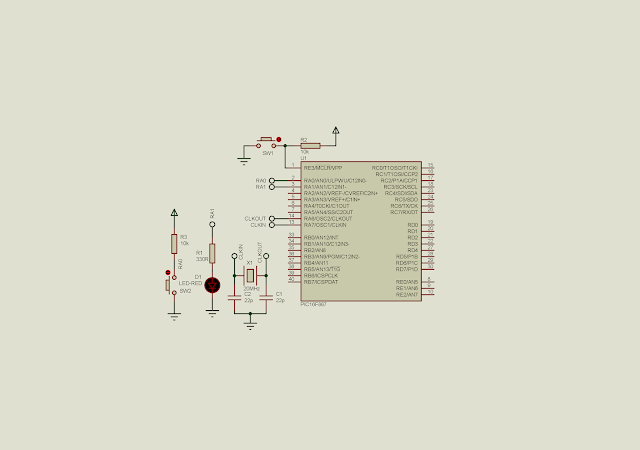
All the registers discussed above are available in MikroC with its own label - for example the ANSEL. I program the controller to read a digital input data from RA0 - AN0 is ignored. This digital input bit will be display on RA1, connects to an output LED circuit.

Using PORTA of PIC16F887 as a digital I/O
Schematic Diagram

When this prototyping circuit installed in the physical board, do not forget to wire the supply pins. The circuit works at 5 V DC. The CPU clocks at 20 MHz.

Wednesday, October 7, 2020

Blinking the PIC16F887 in MikroC

Starting to program a micro-controller is usually writing a code with blinking an LED to make sure that the introductory coding works correctly. Most of embedded C compiler makes a ready to use examples include all the features of their compiler and the target MCU.

However I make an easy beginning to code the PIC16F887 8-bit MCU with MikroC for PIC. A free version of this compiler offers a free firmware building of the coding size that does not exceed 2 Kb of MCU program memory.

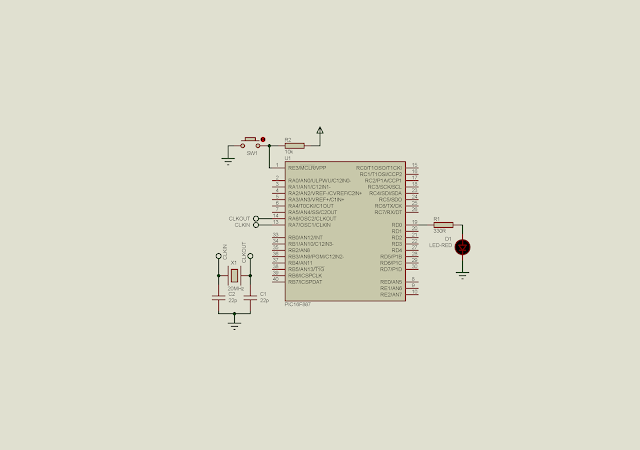
Using  PORTD of the PIC16F887, the CPU regularly toggle pin RD0 for every one second. The delay_ms() function of the MikroC create an acceptable delay time in milli-seconds. 

  1. #define LED PORTD.RD0 // LED IS AT RD0
  2. #define rate 1000 // rate is 1000ms
  3.  
  4. void main() {
  5. LED=0; // CLEAR LED
  6. TRISD=0x00; // PORTD AS OUTPUT
  7. while (1)
  8. {
  9. LED=0; // LED OFF
  10. delay_ms(rate); // wait for 1000ms
  11. LED=1; // LED ON
  12. delay_ms(rate); // wait for 1000ms
  13. }
  14. }

The input parameter to the delay_ms() function is a unsigned long data type. However it is a constant rather than a variable.

Blinking the PIC16F887 in MikroC
Schematic Diagram


Labels

ADC (10) Analog (14) Arduino (12) Atmega16 (19) Audio (2) AVR (20) Charger (1) Cortex-M0 (1) Counter (10) CPLD (25) Digital I/O (22) Display (34) EEPROM (2) Environment Sensor (1) esp8266 (2) Experiment Board (10) I2C (4) Interrupt (7) LCD (1) LDmicro (29) measurement and instrumentation (7) Microchip Studio (3) MikroC (1) One-Shot (3) OpAmp (1) PCB (31) PIC16 Microcontrollers (16) PIC16F877A (2) PIC16F887 MikroC (22) PLC (35) PWM (11) Regulator (1) RTC (2) Sensor (8) Shift Registers (5) SPI (5) Timer (34) UART (2) ultra-sonic sensor (1) USB (1) VHDL (21) xc8 (1) XC95108 (9) XC9536 (15) XC9572 (1) Xilinx (23) Xilinx ISE (22)