Saturday, July 2, 2022

PCF8574T I2C LCD Example with Arduino Uno

In previous post, I showed about the character LCD interfacing with Arduino Uno. It use a parallel data transmission method between the LCD and the Arduino module. We can add a serial to parallel converter IC to make an ease of connection between those two modules. The PCF8574T is an I2C to 8-bit parallel I/O converter chip, comes with small size. It's suitable for character LCD controlling. I2C uses only two wire, SDA, and SCL.

PCF8574T I2C LCD Example with Arduino Uno
PCF8574T character LCD interface module

There are many LCD controlling module based on the PCF8574T on online stores. It's ready to use, since they are designed for character LCD. Some of them are soldered and sold with the character LCD module at low price.

In this example, I use this module connecting with a 16x2 character LCD. It will show a total duration since the Arduino started up.

PCF8574T I2C LCD Example with Arduino Uno
Running program

I use two libraries in this example,

  1. Wire.h, 
  2. TimerOne.h
  3. and LiquidCrysal_I2C.h 

The Wire.h comes with the IDE. But the other two's we need to install. Two I2C pins stay with the same pin of the Arduino analog inputs,

  1. SDA - A4
  2. SCL  - A5

The default I2C address of PCF8574T 0x27, whenever its three address pins are opened.
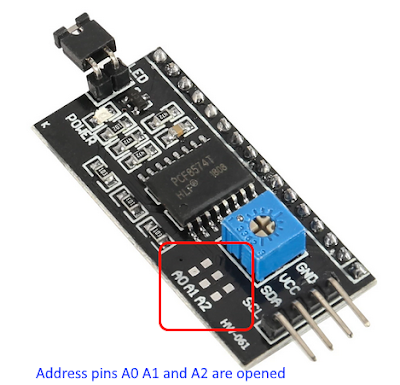
PCF8574T I2C LCD Example with Arduino Uno
Address pin for PCF8574T module

However it's not necessary to change its address here.

  1. #include <Wire.h>
  2. #include <LiquidCrystal_I2C.h>
  3.  
  4. #include <TimerOne.h>
  5.  
  6. //Default address 0x27, LCD is 16x2
  7. LiquidCrystal_I2C lcd(0x27,16,2);
  8.  
  9. void setup(){
  10. //Initialize the LCD
  11. lcd.init();
  12. //Turn On Backlight
  13. lcd.backlight();
  14.  
  15. lcd.print("PCF8574T I2C LCD");
  16. lcd.setCursor(0,1);
  17. lcd.print("Arduino Example");
  18. delay(3000);
  19. lcd.clear();
  20.  
  21. lcd.home();
  22. lcd.print("Powered Up Time:");
  23.  
  24. //Timer1 duration is 1 second
  25. Timer1.initialize(1000000);
  26. Timer1.attachInterrupt(secondCounts);
  27. }
  28.  
  29. int days,hours,minutes,seconds;
  30.  
  31. void loop(){
  32. lcd.setCursor(0,1);
  33. //Show the days, hour, minute, and second
  34. lcd.print(String(days)+" "+String(hours)+":"+String(minutes)+":"+String(seconds)+" ");
  35. }
  36.  
  37. void secondCounts(){
  38. seconds++;
  39.  
  40. //Finding the minutes
  41. if(seconds>=60){
  42. minutes++;
  43. seconds=0;
  44. }
  45. //Finding the hours
  46. if(minutes>=60){
  47. hours++;
  48. minutes=0;
  49. }
  50. //Finding the days
  51. if(hours>=24){
  52. days++;
  53. hours=0;
  54. }
  55. }

It schematic diagram is very simple.

PCF8574T I2C LCD Example with Arduino Uno
Wiring diagram

Click here to download its source file.


No comments:

Post a Comment

Labels

ADC (10) Analog (14) Arduino (12) Atmega16 (19) Audio (2) AVR (20) Charger (1) Cortex-M0 (1) Counter (10) CPLD (25) Digital I/O (22) Display (34) EEPROM (2) Environment Sensor (1) esp8266 (2) Experiment Board (10) I2C (4) Interrupt (7) LCD (1) LDmicro (29) measurement and instrumentation (7) Microchip Studio (3) MikroC (1) One-Shot (3) OpAmp (1) PCB (31) PIC16 Microcontrollers (16) PIC16F877A (2) PIC16F887 MikroC (22) PLC (35) PWM (11) Regulator (1) RTC (2) Sensor (8) Shift Registers (5) SPI (5) Timer (34) UART (2) ultra-sonic sensor (1) USB (1) VHDL (21) xc8 (1) XC95108 (9) XC9536 (15) XC9572 (1) Xilinx (23) Xilinx ISE (22)